Installation and Configuration of Hyper-V Cluster with StarWind Virtual SAN
In this demo I am using three machine to create a Hyper-V Cluster by using StarWind. All three machines details are given below. In my environment my domain name is VICTORINFOSOL.COM
Name
|
IP Address
|
Roles & Features
|
Win2K16-DC01
|
192.168.1.254
|
ADDS &DNS
|
HyperV01
|
192.168.1.241
|
HyperV
|
HyperV02
|
192.168.1.242
|
HyperV
|
HyperV01 and HyperV02 is fresh new installed machine, I have just configured IP on both server and joined to domain.
I have divided this demo in below given parts.
- Part 1 - Downloading and Installing StarWind on Win2K16-DC01.
- Part 2 - Creating Highly Available Storage for the Failover Cluster on Win2K16-DC01.
- Part 3 - Installing Failover Clustering and Multipath I/O features on HyperV01 and HyperV02.
- Part 4 - Discovering Target Portals on HyperV01 and HyperV02.
- Part 5 - Connecting Targets and Configuring Multipathing.
- Part 6 - Creating a Cluster.
- Part 7 - Adding Cluster Shared Volumes.
Part 1 - Downloading and Installing StarWind on Win2K16-DC01.
In this step I am going to install and configure StarWind on Win2K16-DC01.
1.1 Download StarWind setup executable file and evaluation or free key from below link:
1.2 I have downloaded both StarWind setup executable file and evaluation on my Win2K16-DC01, run the executable file StarWind.

1.3 Read and accept the License Agreement, Click Next to continue.

1.4 Carefully read the information about new features and improvements.

1.5 Read text indicates warnings for users who are updating existing software installation, Click Next to continue.

1.6 Click Browse to modify the installation path if necessary, otherwise leave default and Click Next to continue.

1.7 Leave default and Click Next.
Note:
Full installation (recommended)
Full installation includes both StarWind Service and the Management Console elements. It allows users to manage storage resources on the machine where StarWind Virtual SAN is installed, as well as manage other StarWind Virtual SAN installations on the network.
StarWind Virtual SAN Service
This installation type is designed for Core OS editions. StarWind Service is the core of the software. It enables the creation of iSCSI targets as well as sharing virtual and physical devices. The service can be managed using StarWind Management Console from any Windows computer on the network.
StarWind Management Console
The Management Console is the Graphic User Interface (GUI) part of the software that controls and monitors all storage-related operations (e.g. allows users to create targets and devices on the available Virtual SAN servers). Once installed, StarWind Management Console is connected to the servers running StarWind Virtual SAN.

1.8 Specify the Start Menu folder if necessary, otherwise leave default and Click Next to continue.

1.9 Enable the checkbox if you want to create a desktop icon, Click Next to continue.

1.10 Then we prompted to request a time-limited fully functional evaluation key, or a FREE version key, or a fully commercial license key sent to you with the purchase of StarWind Virtual SAN. Select the appropriate option, Click Next to continue.

1.11 Click Browse to locate the license file, Click Next to continue.

1.12 Review the licensing information, Click Next to apply the license key.
1.13 Verify the installation settings. Click Back to make any changes, Click Install to continue.

1.14 Click Finish to close the wizard. Once you click on Finish.

1.15 Press Choose path and Select the Drive which you want to use, in my demo i am going to select E Drive. So select E Drive and Clink Open.
Note: Each of the arrays which will be used by StarWind Virtual SAN to store virtual disk images has to meet the following requirements:
• initialized as GPT
• Have a single NTFS-formatted partition
• Have a drive letter assigned

1.16 Once you click on open, StarWind Management Console opens immediately. Which looks like below.

Note: The default login and password are “root” and “starwind”. You can always change them later. It’s strongly recommended to change the default username/password to protect your StarWind Server from unauthorized access.
Part 2. Creating Highly Available Storage for the Failover Cluster on Win2K16-DC01.
2.1 Press the Add Device (advanced) button on the toolbar.

2.2 Add Device Wizard will appear. Select Hard disk device and click Next to continue.

2.3 Select Virtual disk and click Next to continue.

2.4 Specify the virtual disk location and size, Click Next to continue.

2.5 Specify virtual disk options, (Leave default) Click Next to continue.

2.6 Specify Device RAM Cache Parameters, (Leave default) Click Next to continue.

2.7 Specify Flash Cache Parameters, (Leave default) Click Next to continue.

2.8 Specify target parameters, (Leave default) Click Next to continue.

2.9 Click Create to add a new device and attach it to the target. Then click Finish to close the wizard.

2.10 Repeat the steps from 2.1 to 2.9 to add one more virtual disks with size 200GB, which will be used as Cluster Shared Volumes.
2.11 Once all devices are created the Management console should look as below:

Part 3. Installing Failover Clustering and Multipath I/O features on HyperV01 and HyperV02.
3.1 From Server Manager Dashboard, Click on Manage Then, Click on Add Roles and Features.

3.2 On Before you begin page, Click next to continue.

3.3 On Select installation type page (Leave default), Click next to continue.

3.4 On Select destination Server page (Leave default), Click next to continue.

3.5 On Select Server Roles page (Leave default), Click next to continue.

3.6 On Select Features page Select Failover Cluster and Multipath I/O, Click Next to continue.

Note: Once you Click on Next, Then Add Roles and Features Wizard Popups Click on Add Features.

3.7 On Confirm Installation Selections page, Click Install.

3.8 Once the Installation is Succeeded, Click on Close and Restart the both Hyper-V Servers.

3.9 Repeat the steps from 3.1 to 3.8 to Install Failover Clustering and Multipath I/O features on HyperV02.
Part 4. Discovering Target Portals on HyperV01 and HyperV02.
4.1 Launch Microsoft iSCSI Initiator: Start > Administrative Tools > iSCSI Initiator or iscsicpl from the command line interface. The iSCSI Initiator Properties window appears.

4.2 Navigate to the Discovery tab.

4.3 Click the Discover Portal button. Discover Target Portal dialog appears.

4.4 Type you StarWind Server IP for me 192.168.1.254, Then Click the Advanced button.

4.5 Select Microsoft ISCSI Initiator as your Local adapter and select your Initiator IP for me 192.168.1.241.

4.6 Click OK. Then click OK again to complete the Target Portal discovery.
4.7 Repeat the steps from 4.1 to 4.6 to Discovering Target Portals on HyperV02.
Part 5. Connecting Targets and Configuring Multipathing.
5.1. Launch Microsoft iSCSI Initiator: Start > Administrative Tools > iSCSI Initiator or iscsicpl from the command line interface. The iSCSI Initiator Properties window appears.
Click the Targets tab. The previously created targets are listed in the Discovered Targets section. Select a target located on the local server and click Connect.

5.4. Enable both checkboxes. Click Advanced.

5.5. Select Microsoft iSCSI Initiator in the Local adapter text field, In the Initiator IP select 192.168.1.241 and In the Target portal IP select 192.168.1.254. Click OK.

5.6. Click OK, to connect to the target.

5.7. Repeat the steps from 5.1 to 5.6 for Disk02 to connect to the target.
5.8. Once both target is connected, Click OK.

5.9. Repeat the steps from 5.1 to 5.8 on HyperV02 to connect to the target.
5.10. Once all targets are connected, launch the MPIO manager: Start > Administrative Tools > MPIO Or mpiocpl from the command line interface. MPIO manager window will appear.

5.11. Go to the Discover Multi-Paths tab and enable the Add support for iSCSI devices checkbox, Press the Add button.

5.12. Then restart the both Hyper-V Servers to apply the changes.
5.13. After both Hyper-V Servers are restarted and the MPIO support is enabled we have to configure the MPIO policy for each device specifying as the active path.
5.14. Open iscsicpl from cmd, and Select a first target and click Devices.

5.15. Devices dialog appears. Click MPIO.

5.16. Select Fail Over Only load balance policy and then designate the local path as active.

5.17. Repeat the same steps from 5.14 to 5.16 for second target.
5.18. Repeat the steps from 5.14 to 5.17 on HyperV02.
5.19. Go to Computer Management, Disk Management then right click on both Disk and online both Disk which is coming from StarWind.

5.20. Initialize both Disk as GPT and Click OK.

5.21. Create partition on both Disks.

5.22. Now go to HyperV02 and just Refresh the Disk Management from Computer Management and verify same has been reflected on HyperV02 also once you make both disk online.
Part 6. Creating a Cluster.
6.1 Open Server Manager, Select the Failover Cluster Manager item from the Tools menu.

6.2 Click the Validate Configuration link in the Actions section of the Failover Cluster Manger.

6.3 Click Next to Continue.
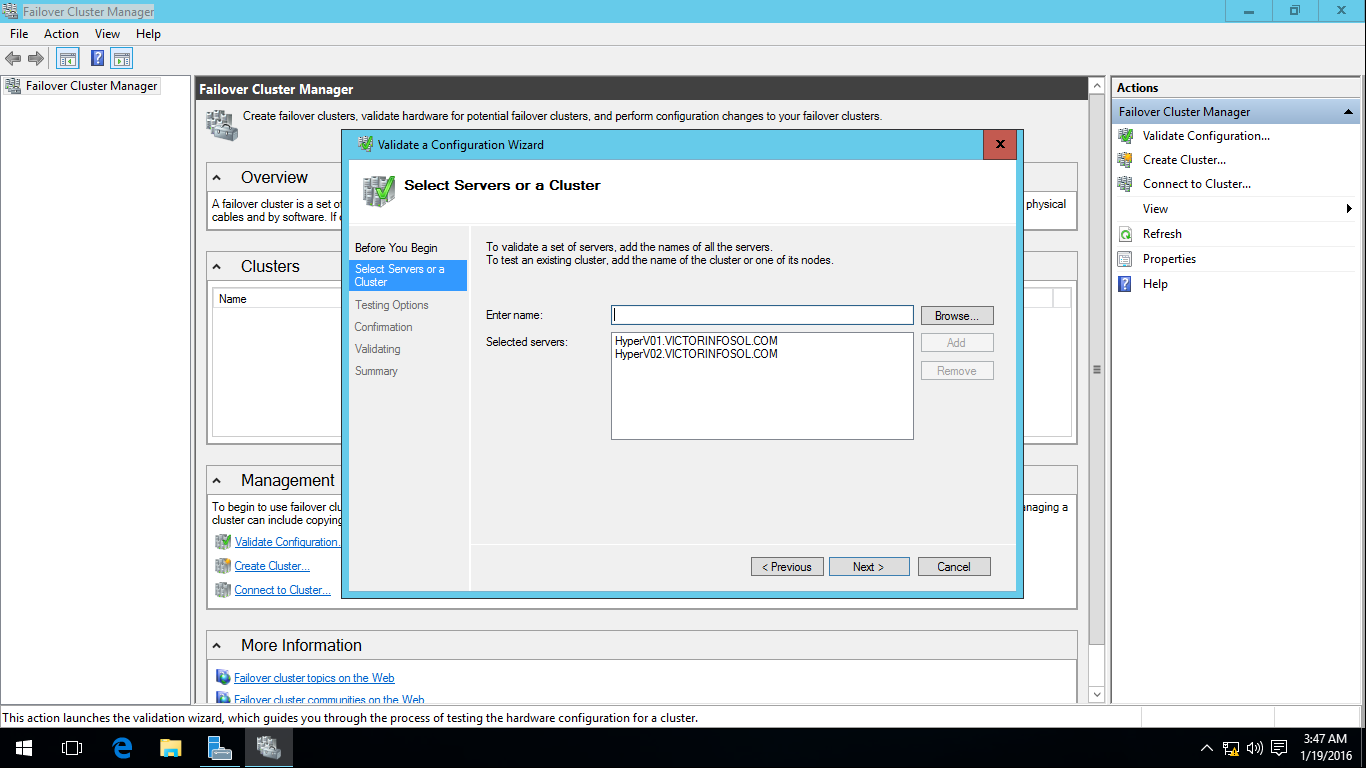
6.4 On the Select Servers or a Cluster page Browser both Hyper-V Servers, Then Click Next to Continue.

6.5 On the Testing Options page, Click Next to Continue.

6.6 On the Confirmation page, Click Next to Continue.

6.7 Once the Validation is finished with any error, We are good to create HyperV Cluster, Check the Create the Cluster using the Validated nodes and Click on Finish to Create a Hyper-V Cluster.

6.8 Once you click on Finish, Create Cluster Wizard will popup, Click Next to Continue.

6.9 On Access Point for Administering the Cluster, Type the Cluster name and assign the IP Address for new cluster, Which is going to access by these details after cluster creation.

6.10 On the Confirmation page, Click Next to Continue.

6.11 Once the Cluster is Create Successfully, Click on Finish. Now we have created the Cluster Successfully for Hyper-V.
Part 7. Adding Cluster Shared Volumes.
Note: To add Cluster Shared Volumes (CSV) that is necessary to work with Hyper-V virtual machines:
7.1 Open Failover Cluster Manager and Go to Cluster->Storage -> Disks.

7.2 Right-click the required disk and select Add to Cluster Shared Volumes.

7.3 Once the disks are added to the cluster shared volumes list you can start creating highly available virtual machines.
That is all about how Installation and Configuration of Hyper-V Cluster with StarWind Virtual SAN. I hope this will help you in understanding and configuring
Hyper-V Cluster.
Thank You
Vikas Singh
Vikas.9452@gmail.com
VikasSingh.9452@hotmail.com
How To Install And Configure Hyper-V Cluster With Starwind Virtual San - Microsoftadmins >>>>> Download Now
ReplyDelete>>>>> Download Full
How To Install And Configure Hyper-V Cluster With Starwind Virtual San - Microsoftadmins >>>>> Download LINK
>>>>> Download Now
How To Install And Configure Hyper-V Cluster With Starwind Virtual San - Microsoftadmins >>>>> Download Full
>>>>> Download LINK bX